Recently two manufacturers published service bulletins as reaction to damaged harnesses found in the field (links at the bottom of the page). There has been a lot of fuzz about this on facebook and the forum, so for those that don’t exactly know whats going on I try to give a little info on harness construction to help understand how this kind of damage can happen.
The rise of lighter gear has been blamed by some, but the harness construction pretty much stayed untouched besides favoring integrity riser (also called “build-in riser”) harnesses on some light gear over L-bars or 3 rings. So quite a lot of the “light” gear is just a low profile version with possibly a lighter container construction to save weight compared to the regular / “not-light” rigs.
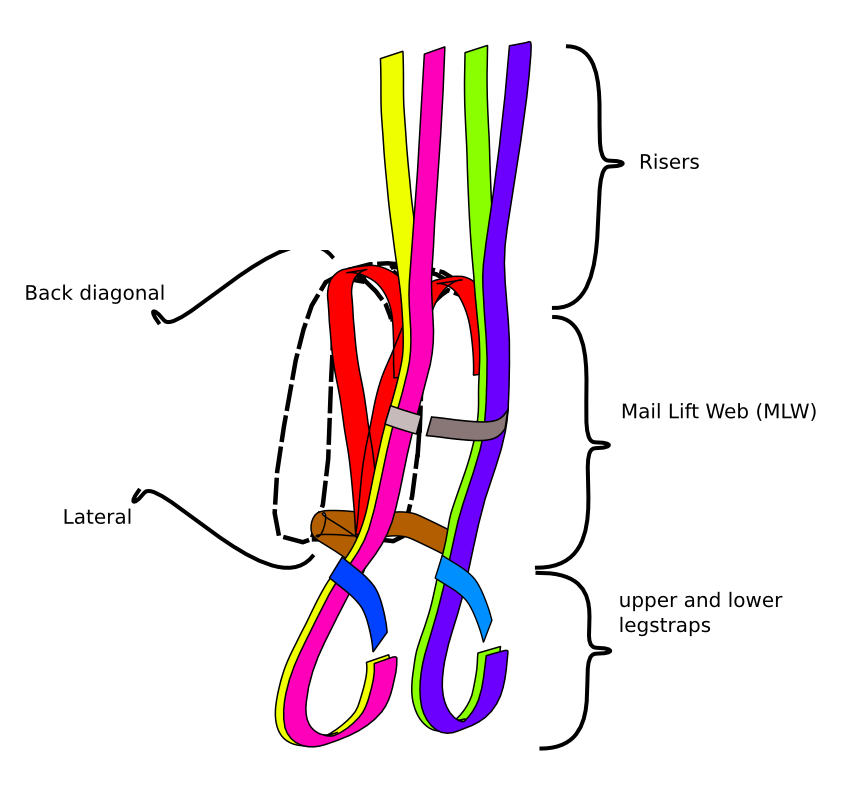
Harness construction
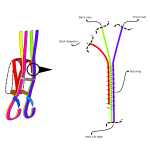
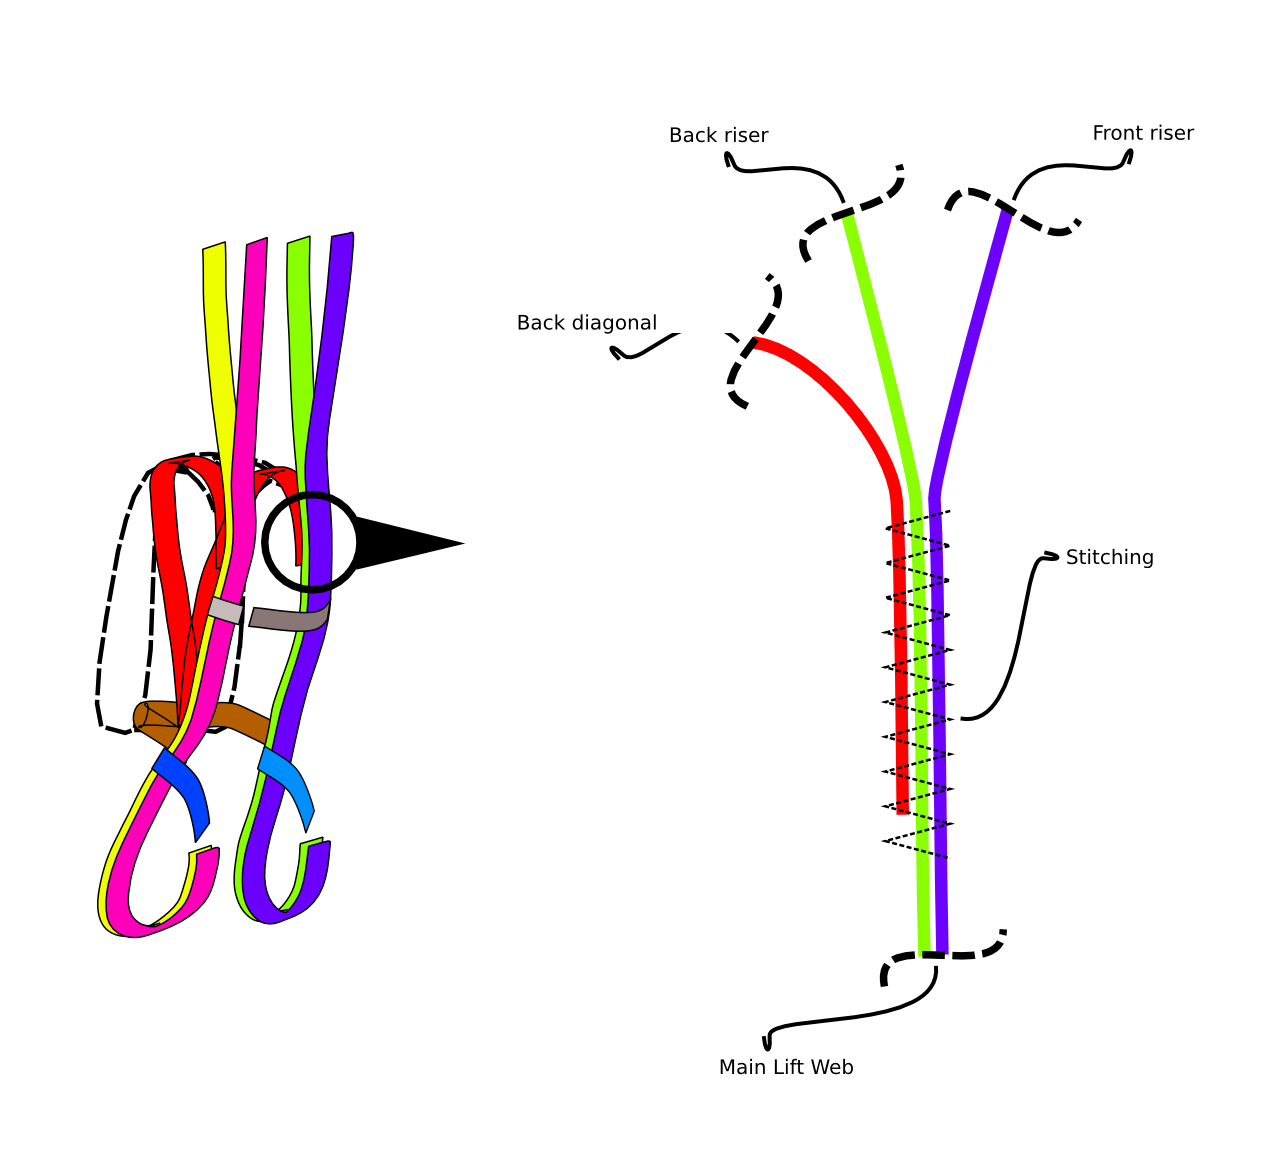
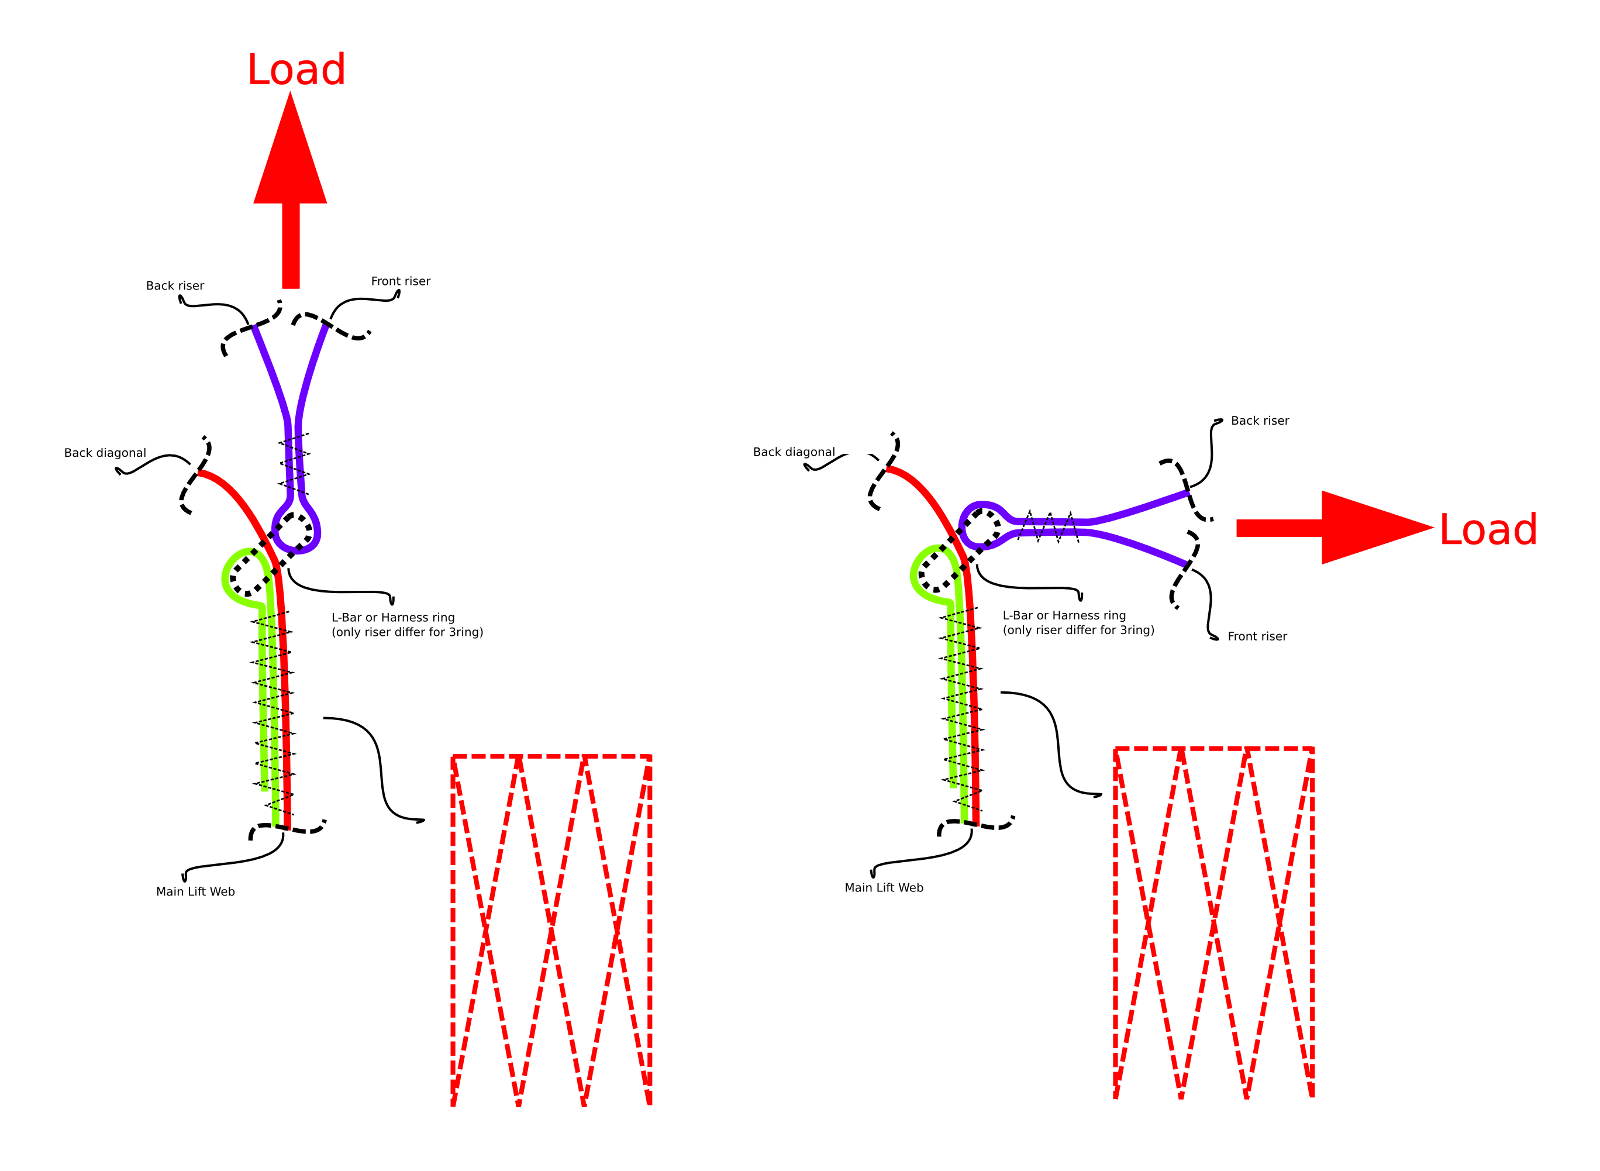
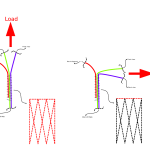
An overview on the parts that constitute a base harness, and to give you a basic idea of which piece of webbing starts and ends where and which way it follows around your body, as well as whats the difference between a harness equipped with L-bars / 3 ring or integrity risers. The pictures show how most non-articulated base rigs are made today (as of august 2014). Not all manufacturers build their harnesses in the exactly same way, but most of the differences are not apparent at this low detail level anyways. Of course there are some designs that differ quite a lot, but this should cover how most manufacturers build their base rigs.
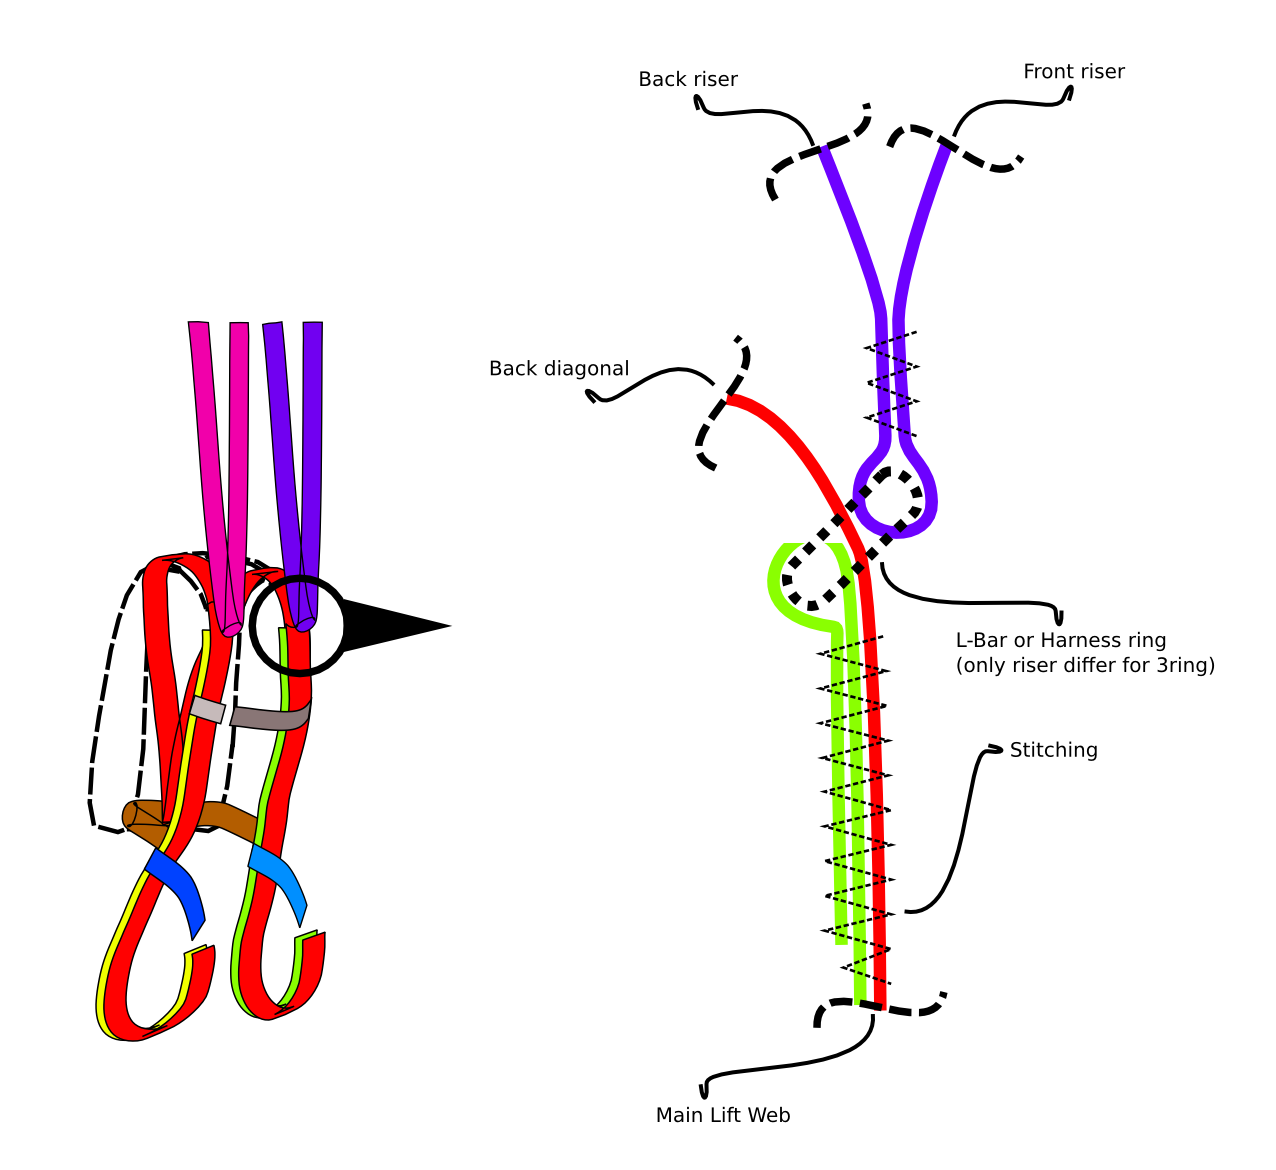
To make this whole thing a little bit easier to comprehend I made some simplifications. Hardware, fabric buffers, confluence wraps, joints, folds are not shown, and continuous pieces of webbing have the same color. The joint that is shown in detail is the MLW / back diagonal joint, which is also simplified by not showing tersh loops that some manufacturers add, confluence wraps and buffers are also excluded.
-
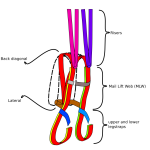
- Parts of a L-bar / 3 ring harness

-

- Parts of an integrity riser harness
-
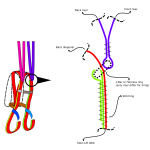
- MLW / back diagonal / riser joint on a L-bar / 3 ring harness
-
- MLW / back diagonal / riser joint on a integrity riser harness
Notable exceptions, and examples of possible differences.
- Regarding the difference between 3 ring and L-bar setup, only the riser side differs since the L-bar / big ring are attached to the harness in the same way.
- On adrenalin base rigs with integrity riser that were sold from august 2014 on, the whole MLW / back diagonal / riser joint was redesigned as a reaction to damage harnesses. (see document at the bottom of the page)
- On the squirrel stronglites, an additional piece of webbing is used to back up the same joint as reaction to a damaged harness (from august 2014 on) (see also document at the bottom of the page) as well as the leg straps are fixed size loops of webbing so that the upper and lower legstraps, lateral, MLW and risers are build with 2 continuous pieces of webbing.
- Different ways of how hip rings are incorporated, but none of them change the way the MLW / back diagonal joint looks like.
- Back diagonal not being a V-, but an X-shape, so that there is no separate lateral webbing, but the back diagonal extends out of the container at the bottom meeting with the MLW again. (rarely seen in the field)
- And a lot of stuff that doesn’t make a big difference at this detail level, like the chest strap assembly, or single layer Ty7 instead of double layer Ty8 legstraps, etc.
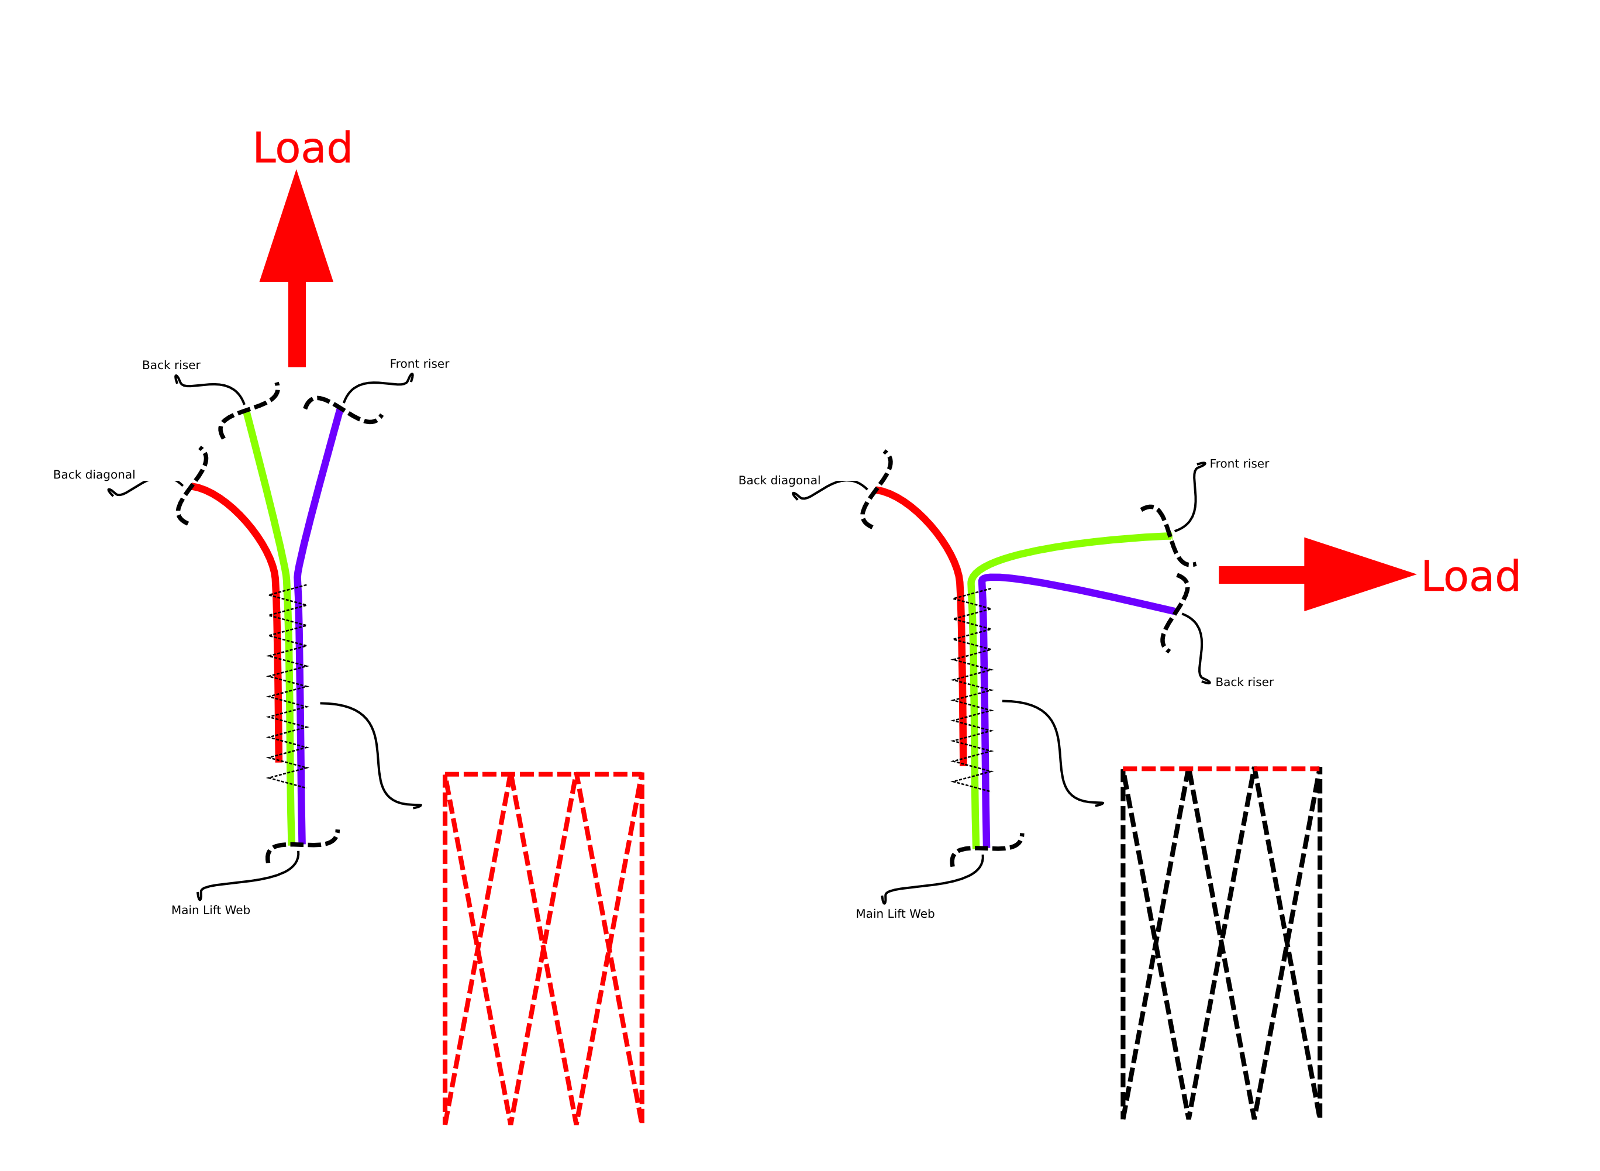
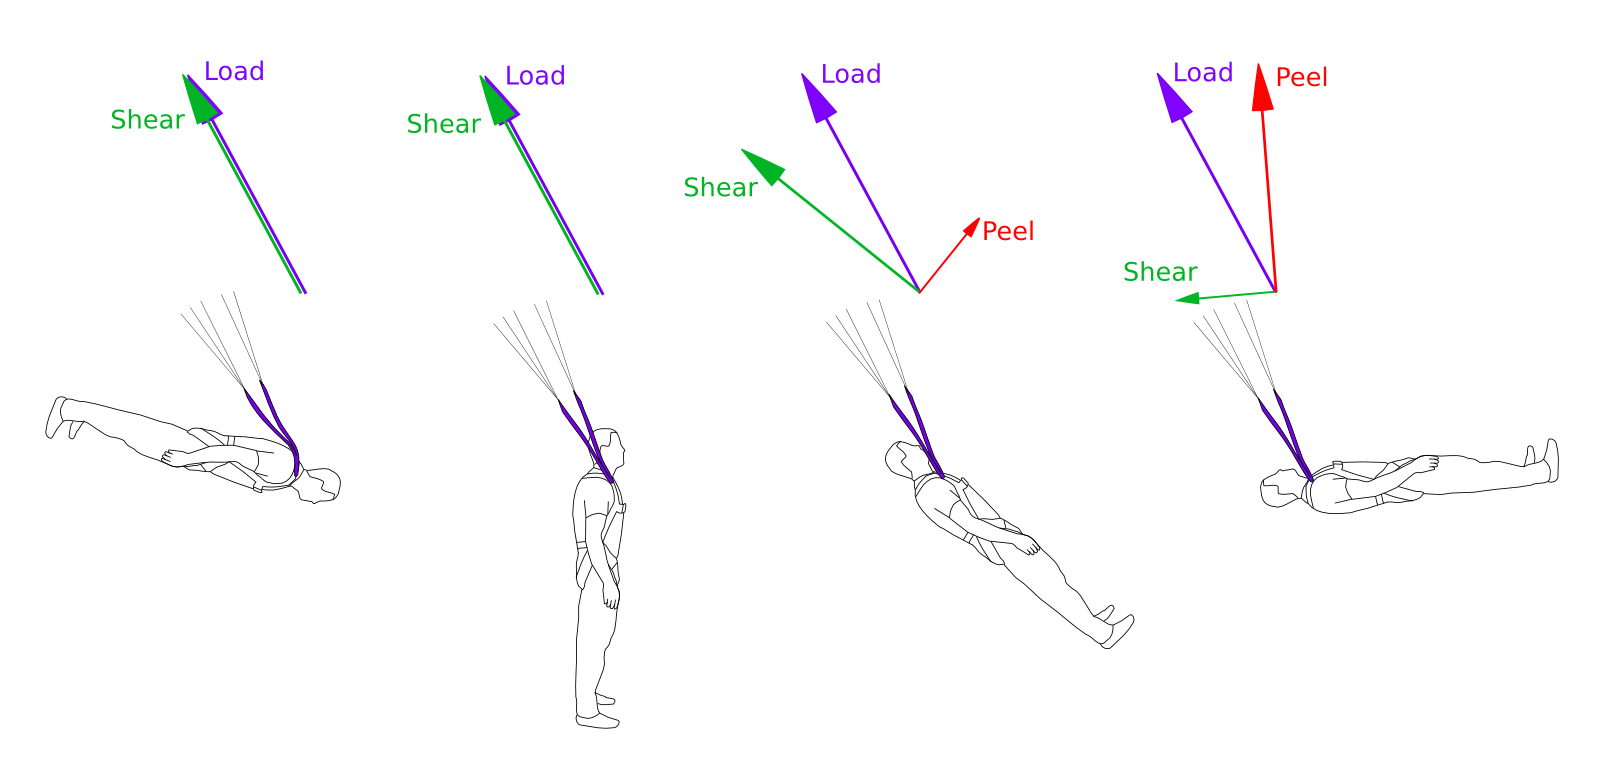
Shear vs Peel
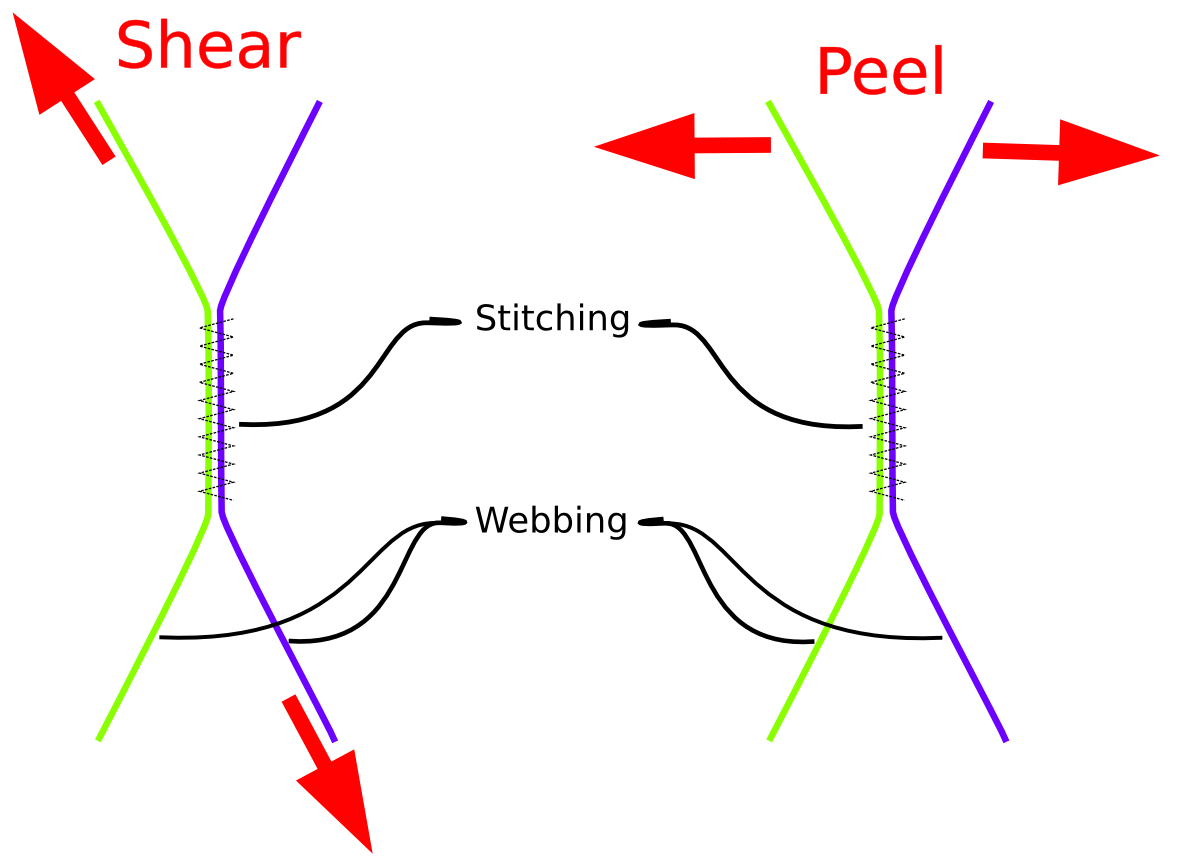
Shear vs force
The picture to the left shows the difference between “shearing” and “peeling” a webbing joint. If you would want to rip those two pieces of webbing apart, you would end up pulling in peel direction intuitively since it will be easier to break the stitching that way. Peeling force on a webbing joint should therefore be limited or if possible completely prevented since the joint will break way earlier than with force in shearing direction.
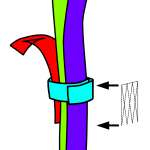
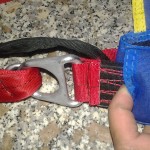
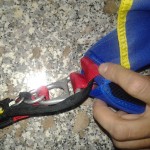
The pictures below show the MLW / back diagonal / riser joint of an integrity riser harness and a L-bar / 3 ring harness. The stitch pattern that holds together the webbing pieces is shown next to them for different pull angles, the color of the stitch patter should display how the force is distributed over the stitches (very roughly). As you can see, with an integrity riser harness you can apply a peeling force on the MLW / back diagonal / riser joint by pulling the risers away from the MLW so that only the top row of stitching is taking the load. For example, pulling on your back would give you this kind of peeling force on this joint, and it is easy to see that one could actually damage something this way.
-
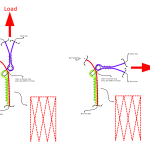
- Different riser pull directions on L-bar / 3 ring harness
-

- Riser pulling inline with MLW on L-bar / 3 ring harness
-
- Riser pulling away from jumper on L-bar / 3 ring harness
-
- Different riser pull directions on integrity riser harness
-
- Riser pulling inline with MLW on integrity riser harness

-
- Riser pulling away from jumper on integrity riser harness
-
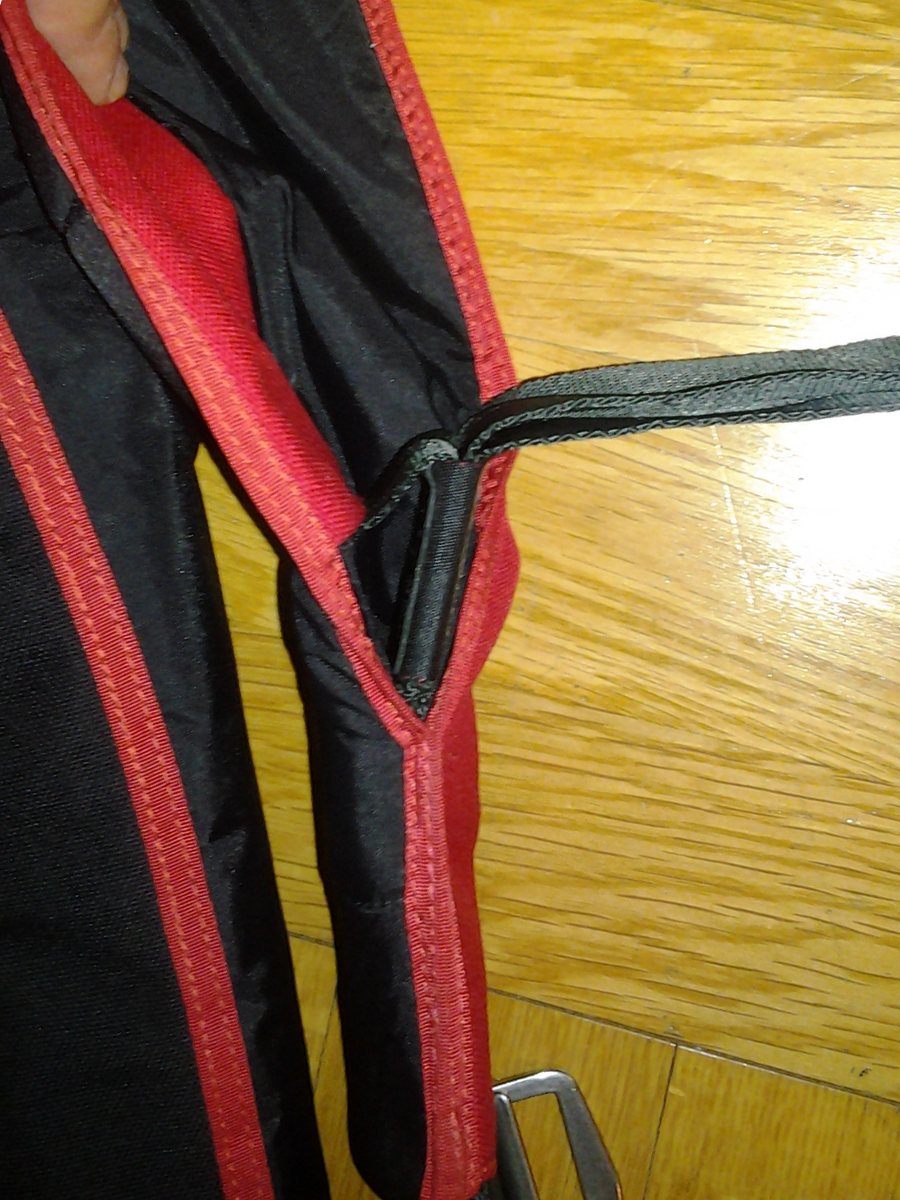
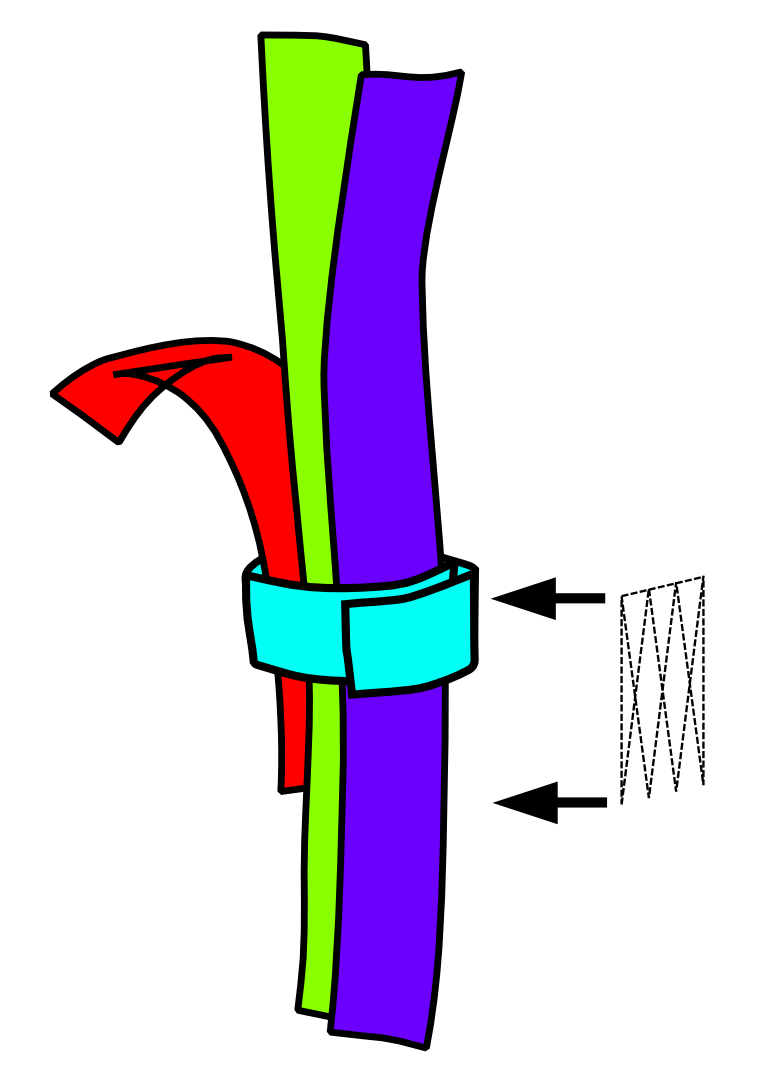
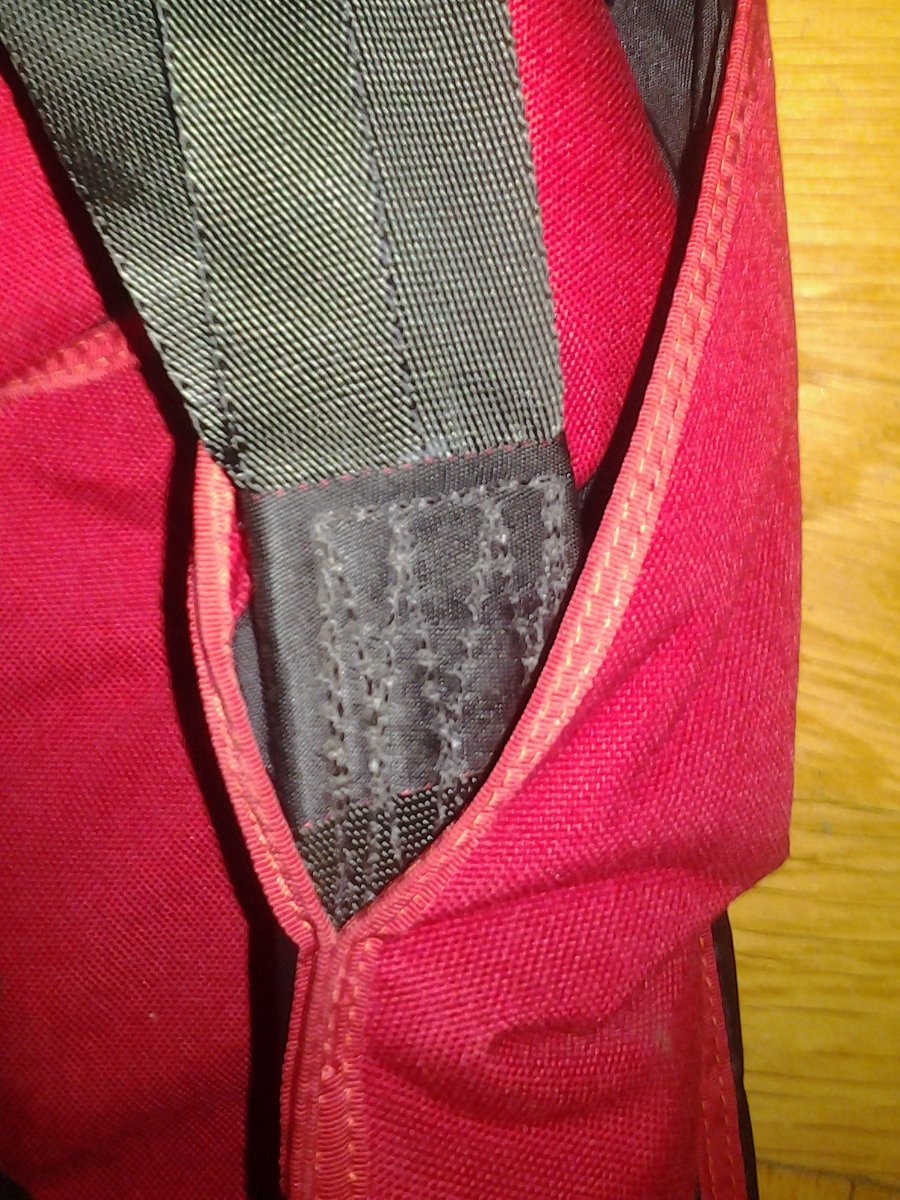
- Damaged webbing joint
Webbing joints
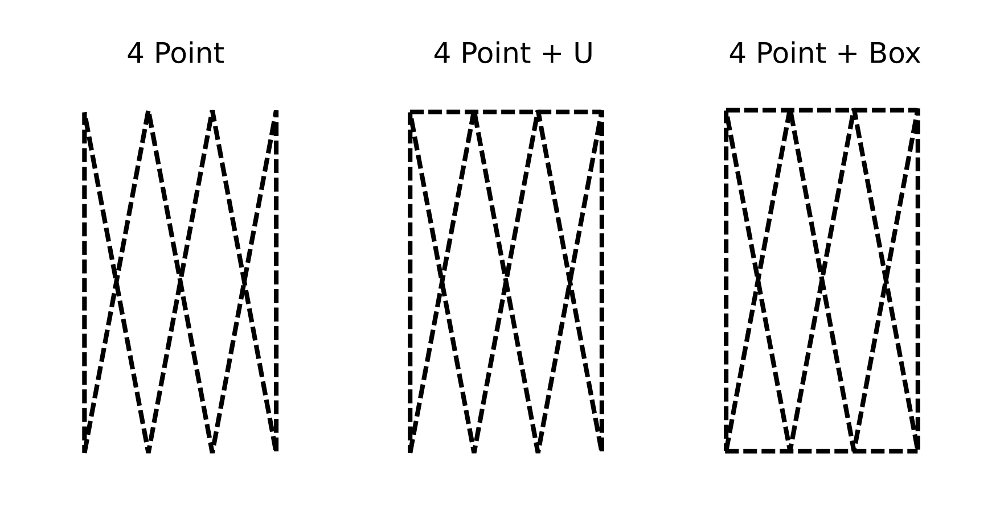
To make this joint more robust, a stitch pattern with a row of stitching across the 4 point is used (as a 4 point + U or a 4 point + box) for integrity riser harnesses. (Short example: Ty8 (1 23/32″ wide) joint, sewn with 5 cord (breaking strength of 40lbs) at 5 stitches per inch, using a 4 point with an U or box, would give you about 12 stitches in the top row, and therefore (very) roughly 720lbs (with 1.5x40lbs per stitch) of breaking strenght when only pulling on the top row. While a 4 point without the U or box would have only 4 stitches in the top row and therefore only 240lbs when pulling on the top row.)
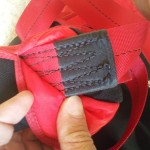
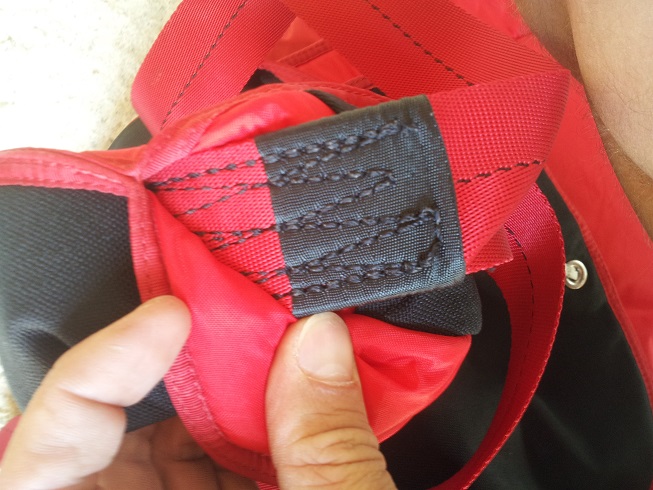
To add another bit of strength, a piece of webbing is wrapped around the joint before sewing. This is called a confluence wrap and can make the joint by a few percent stronger, and also helps against splitting/peeling. The webbing used for this should be at least 30% of the strength of the webbings that are sewn together [Poynters Parachute manual], the material used for this part on most base rigs is Ty12 (the stuff with the red lines at the selvage) (Ty4 is also used for this).
-
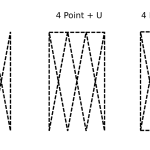
- Stitch patterns commonly used for this joint
-
- Sketch of a joint with a confluence wrap
-
- Confluence wrap
But none of the guys that damaged their rigs were pulling on their back, so how could this happen?
Well, you don’t necessarily have to pull in a bad body position to apply some peeling force on this joint, when tracking/wingsuiting you most likely see your feet in front of you on opening. In this moment part of the force coming from the risers is partially applied in a peeling fashion to this joint. And the damaged rigs have shown that this can be quite a big amount of force, enough to do some damage to the joint. Of course, the faster the track, the heavier the person, etc. the worse, as well as an improperly sized rig adds to the problem. (In the picture below forces and angles of force are exaggerated, since in the real world the MLW is not nailed to the jumper and can move a bit, eg. be lifted away from the body reducing the angle again, but you get the idea…)
 How come that this problem suddenly came up at the same time with two different manufacturers?
This problem is not new. There have been similar damages on skydive rigs already long ago (since the reserve riser / back diagonal joint on a modern skydive rig is essentially the same as the joint on an integrity base rig), this is why the stitch patterns with a U or box, as well as confluence wraps became the standard we now have.
I’m not really sure why we see this cluster of incidents right now. But I suppose its a combination of a integrity risers getting more and more popular (when I started jumping 6 years ago I didn’t see that many of integrity rigs around as now), tracksuits are getting bigger and better performance wise, while untrained jumpers tend to either stall them or go way to steep and fast. And last but not least I think people see harnesses as indestructible and therefore don’t see the problem in constant hard openings or are mistreating it with by for example using chest straps for rappelling, and don’t check their gear very often.
On a personal note… (hopefully not pissing off too many people)
<Rant>
I think marketing equipment as indestructible and fail proof is adding to the problem because a lot of people will treat their gear accordingly, while showing what can go wrong, including how and why, could actually lower incident rate a bit.
I also can’t see the necessity of certifications for our harnesses, one of the manufacturers that published bulletins had it certified by independent organization, but let an established skydiving industry standard slide (confluence wrap should be at least 30% of webbing strenght). (For matter of completeness, the other manufacturers gear has been certified by german standards years ago as is stated on their website.) While i see that load and drop tests are necessary to verify a design, the resulting certifications seem like a marketing gag to be used as marketing tools (like a TSO has been used as a primary sales argument by yet another manufacturer). If a manufacturer sells a harness that is made according to industry standards I don’t need a certification to tell me that its going to be fine, however if they deviate from these standards it would be nice to know in which way.
Regarding the comparison of our gear with climbing equipment, with some people stating that the standards there are higher. I really don’t think thats accurate, climbing gear manufacturers also fuck up sometimes, just google “climbing gear recall”. (For example there was a climbing fatality due to gear failure in Austria 2 years ago that resulted in 10 manufacturers recalling via ferrata equipment (link).)
And when it comes to skydiving equipment, just have a look at this comprehensive list of service bulletins, some of the issues described there are also valid for base gear and worth reading.
By now our base equipment is actually pretty awesome, the manufacturers have been doing a great job keeping people from dying because of gear failure, and gear is constantly evolving. Looking at the size of the market, and the number of test jumps that can be done in a certain amount of time, its interesting to see people demanding a solution asap / a faster evolution of gear while complaining about being used as “test jumpers”.
</Rant>
Documents
Squirrel service bulletins and product modification procedure:
SB-14-8-1
SB-14-8-1-Update-1
PMP-14-8-1
Adrenalin base service bulletins and document showing improved design:
service_bulletin_25_06_2014_eng
soft_bars_en
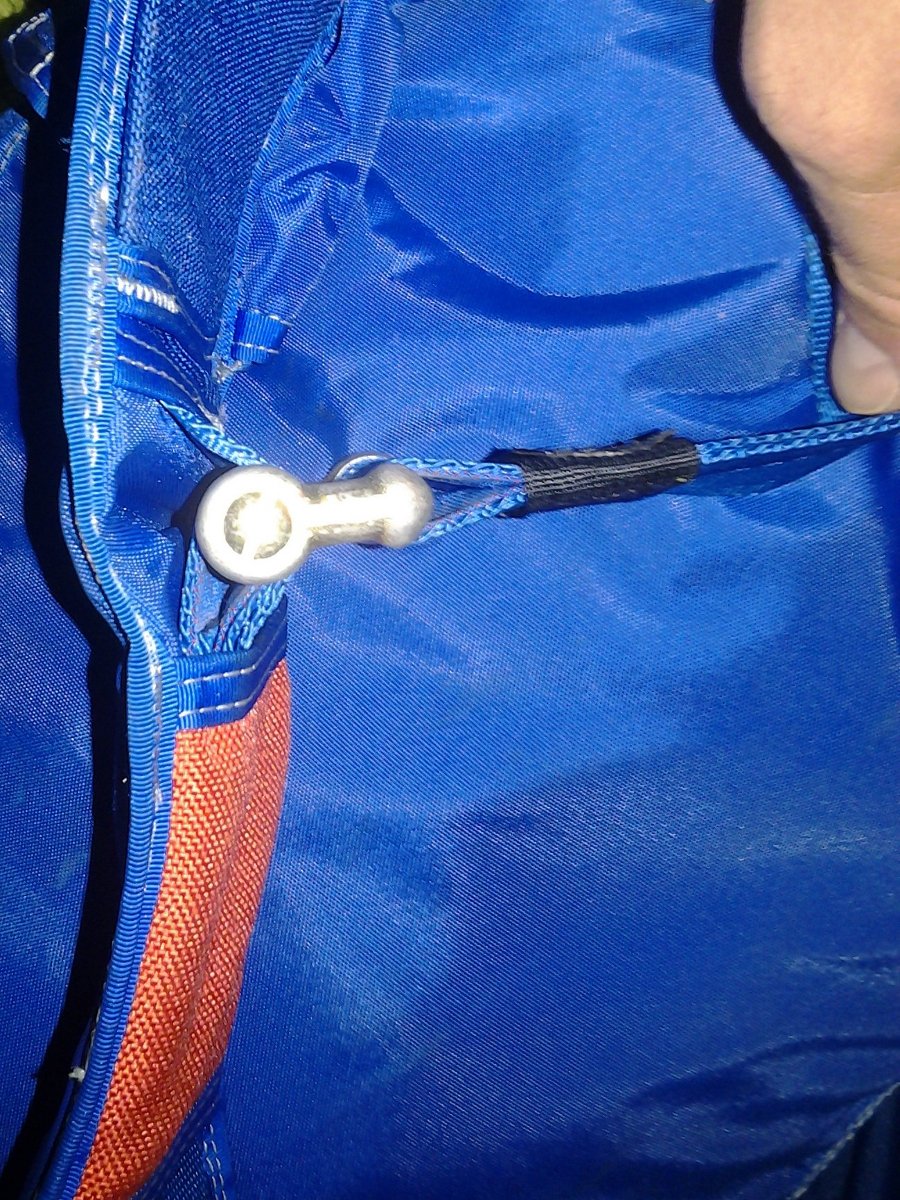
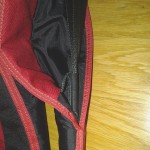
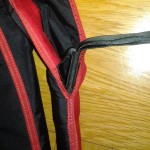
Find waldo
I had these pictures lying around for quite some time now (yes, this is a base rig) and finally have some use for them. After reading the above article, can you find the problems in this setup?
Thanks (again) for having explained easily some rigger topics. Really useful.
Yet more excellent work.
Excelent article !
Regarding last picture, I think back diagonal should pass trough base of bent D ring (3ring base ring).
What manufacturer was that ?