CWY Staticline

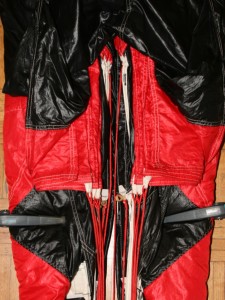
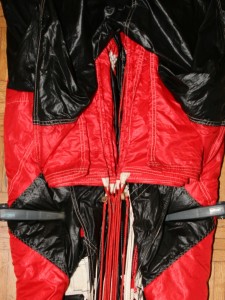
This is the CWY staticline system I use. I don’t have a clue who invented it in the first place, but discussions about it on bj.com date back quit a while, so its rather old and a lot of people are using this. This is actually the second half of a double post, so before you start, read this.
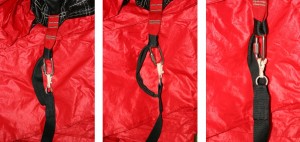
The red part (900 lb Dacron) is the actual staticline that goes around the anchorpoint and is attached to the bridle with breakcord, while the white part (525 lb Dacron) is responsible that the system stays with you after the staticline has done its job.
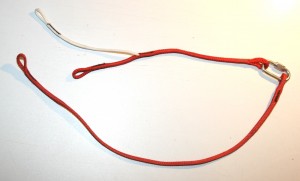
Setting it up

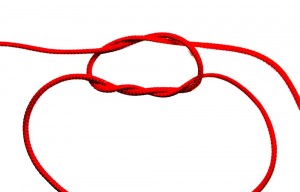
  • Put an overhand knot in bridle, approximately half way between pins and PC. I try to have enough slack to have the PC away from snag points, dangling free from the object to not drag it over the edge, assuming I have no winds and the object allows me to do so. (The PC can also be attached with another piece of breakcord to the anchor point)
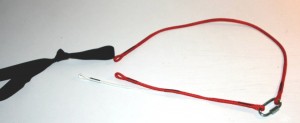
  • Put a piece of breakcord through both load taking ends (the red ones) and through the loop on the bridle and close with a surgeons knot. I make this first loop rather small.
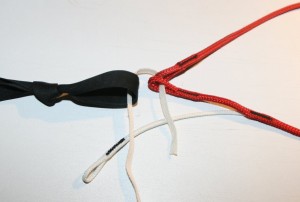
  • I add a second loop of breakcord, routed same way as the first one but make it a little bigger (app. 1 cm wider), to ensure that its loaded after the first one broke.
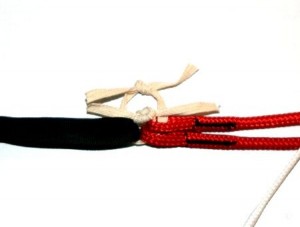
  • Back up both surgeons knots with a few knots on top to ensure they cannot move.
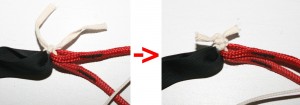
  • At last I attach the white end of the staticline to the bridle, also with a loop of breakcord closed with a surgeons knot. This will pull the staticline off the object after the breakcord broke and released both red ends. Make sure that it is not going to be loaded before or at the same time as the wider breakcord loop, because then you would loose the staticline (its most likely that it will just fall off the object in that case), if in doubt make the breakcord loop you attach the white end with a bit longer.
    The white end can also be attached to the bridle with a larks head, although I prefer a loop of breakcord just case that your staticline system would snag somewhere (although unlikely since the longer end that goes around the object is only spliced and has little snag potential). In 50 staticline jumps with this system I lost it in two cases (found both again at the bottom of the object). Shape of the anchor point and and friction play a role there.
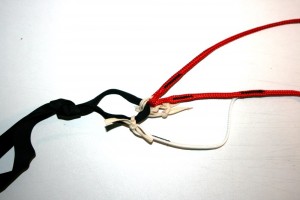
  • On the object I open the rapide link to put the staticline on the anchor point. Take care that the carry with you part is on the upper side. One could also use the staticline without the rapide link and the longer part, but then you have to do the knots on the exit.
Posted in Packing, Safety | 1 Comment

Staticline jumps

After seeing some funky, and a few quite dangerous constructions I just want to add my 2 cents… This is not a guide on how to do staticline jumps, go find someone that shows you how to do it the right way.

Since this post was getting rather long I split it into two parts,  first off, some dos, don’ts and other things to consider below, and second, the CWY Staticline setup I use.

  • Always leave your PC on! Premature brakes do happen and without a PC you will be fucked. (see video here)
  • Keep the PC away from snag points, try to minimize contact of your PC with the object, and take care that it is not dragged over the edge after the staticline released.
  • Have your anchor point aligned with yourself in your jump direction, if your anchor point is off to one side you will get offheadings.
  • Redundancy is your friend. Use two different sized loops of breakcord, if the first one breaks too early because it was damaged, or the knot was bad, etc, the second will save the day. However, if the first one breaks because it is overloaded, the second one will follow right away (see next point).
  • Dynamic force is not your friend. Keep the distance between the pins and the anchor point for your staticline as short as possible to reduce snatch force. Your staticline setup has to hold the force it takes to stop your canopy after it was falling for the length of the bridle, this problem is getting bigger with the size of your canopy due to its weight.
  • Check your equipment! Some parts of your equipment may wear faster than they would on freefall jumps, burn marks and abrasion on bridles, damaged PCs, etc, are quite common.
  • Use a surgeons knot for the breakcords. A lot of knots can “flip” over when they are loaded, letting one side slip. If you use something different than a surgeons knot make sure this can’t happen with it.
  • Check your breakcord before you use it for the first time! Just to be sure that you really bought the right material, they also sent you the right material, its not damaged, etc. You could use a bathroom scale for this, attach your breakcord somewhere on your ceiling, or above a door, or …, and read off the scale how much of your weight you can put on it before it breaks.
  • Test new staticline setups on a forgiving object that is freefallable. Just in case you got something wrong.
  • Doubleheck every knot on your breakcords prior jumping, and do another few knots on top of the surgeons knot. As I found out those are not for aesthetic reasons, but to prevent the surgeons knot from loosening.
    Long story short, I had the staticline already set up and carrying around in my pocket for some time, attached it to the railing before giving another jumper a PCA, and when I finally climbed over the railing both (!) knots went loose and the whole thing just fell off the anchor point, so I found myself already on the other side looking down at my staticline dangling together with the PC below the bridge.
  • Friction’s a bitch! Try to prevent that the staticline has to go over an edge, and use a staticline system with which friction on the anchor point does change the force required to break the breakcord.
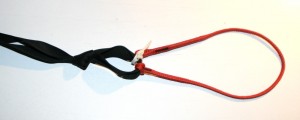
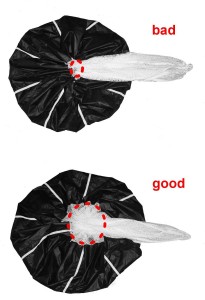
    Below is an example of such a “bad” CWY setup where one side is directly attached to the bridle and the knot on the other side. This system would release when loaded 150kg in theory (assuming that the loop itself would break at 75kg, see this post) which is quite a lot already. In real life the friction force it takes for the staticline to move over the anchor point can get rather big, big enough that the sum of all forces exceed the bridles strength, that is weakened (a lot) by the knot.
    See picture aside, thanks to Andreas for permission to use the picture.
    I tried to reproduce this with E-thread insted of breakcord and measured 5kg break load for the loop of E-thread, 10kg if this system is used with a carabiner as anchor point (wich adds only little friction), and more than 15kg with a climbing hold that has a rough surface. So factor 3 or even more on the breaking strenght of the loop could occur if the anchor point is rusty, has sharp edges, etc.

  • Watch thy bridle! When the staticline is set up to the anchor point, move carefully to not pop your pins prematurely, and take care to not entangle with the bridle. Check bridle routing when you are standing on the exit and are ready to jump, and watch your feet!

    http://vimeo.com/34468248
    Thanks to Beslan for the video!

Leave a comment if you have something to add!

Posted in Safety | Leave a comment

PC hesitations

This is about PC hesitations on short delays when going stowed. The problem with PC’s that have been packed in the BOC for a longer period of time should be well known, so this isn’t really what I was going to write about (although it plays a role in the hesitation described below)… but just in short-, the material (especially ZP) remembers its shape after some time, do not underestimated this effect, as it will slow down the opening of the PC drastically. Repack your PC prior jumping!

But even with a freshly repacked PC hesitations can happen, like those here and here. (although the second PC was packed for quite some time afaik)

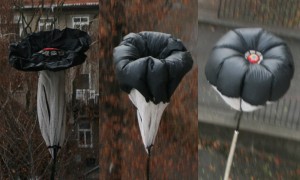
The inflation process of a PC when load is applied, (bridle reached stretch) divided into three stages:
1. Mushroom, skirt closed.
Has the same shape as the mushroom when packing the PC. (The skirt is the seam around the PC that holds upper and lower part of the PC, ripstop and mesh, together.)
2. Inflating, skirt open.
Air enters through the opened skirt and inflates the PC starting at the top (same as inflation of a round canopy). This stage can be rather short, since it does not take a lot of air to fill the PC, and the PC practically being a apex-pull-down round canopy (it has a center line), so the skirt can move freely, and therefore can spread very fast.
3. Open!
Its open!

All PC’s in the video below have been packed just minutes before the jump, thanks to weaselman for the last clip, original video can be found here.

http://vimeo.com/34126780

Mushroom hesitation
The mushroom shape in stage 1, can stay stable while being dragged through the air for quite some time, like in the last part of the video above. The opening sequence just stops here because the skirt is closed off tight and only little or no air enters the PC. Some factors have to be met to make this happen, certain airspeed, little deformation of the PC prior reaching bridle stretch (this is where the shape memory problem comes into the equation), etc, so this is really hard to reproduce. The main cause for this type of hesitation, is closing the PC’s skirt too tight when packing it.
This form stays stable until the skirt is opened, which will happen by chance as airspeed increases and flow around and behind the PC is getting more turbulent as it is accelerated, as well as the field of decreasing pressure around the PC is pulling its fabric outwards. In the video above one can see that at first only one panel of the skirt got pulled aside immediately letting air in so the rest of the skirt is opened as well.

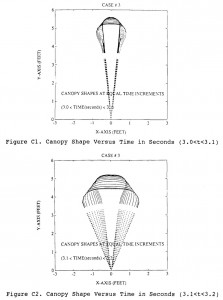
If the PC made it to stage 2, therefore the skirt opening reached a certain size and air is entering the PC, no hesitations are going to happen anymore (except there is some mis-rigging issue, damage, etc). As stated above and seen in the video the PC inflates very fast from here on, depending on air speed, maybe literally “pop” open the PC. The figure aside (Fig c1 and c2) shows that horizontal expansion is not linear, but the bigger the skirt opening, the faster the further skirt expansion. (both graphs show expansion within 0.1s time, taken from “Parachute inflation, a problem in aeroelasticity” by Stein and Benney)

To reduce the risk of hesitations:

  • Leave some mesh to the sides of the mushroom when packing to not close the skirt all the way. Be careful that the little slack of centerline can not entangle on an internal handle or similar.
  • After folding the bridle, carefully fold the mesh over it, without pulling more mesh from the bottom, or rolling the excess mesh.
  • Repack your PC before jumping.
  • Go handheld if in doubt.

Vents
This kind of hesitation can happen with vented and unvented PC’s. I have the idea that a vent will make this more likely to happen, if the little air that enters a small skirt opening leaves the PC through the apex vent it could possibly delay inflation, but I don’t have sufficient data to do any comparison.

References
“Parachute inflation, a problem in aeroelasticity” by Stein and Benney

“The fluid dynamics of parachute inflation” by Peterson, Strickland and Higuchi

“Inflation of a round” by Johnny Utah

Thanks to Mahle for pointing this out to me in the first place, and to Johnny Utah for sharing his experience. Comments are appreciated!

Posted in Packing, Safety | Leave a comment

BASE AFF

I present the worlds first BASE AFF course:
The course consists of only 3 levels that have to be completed by the student without killing himself and/or the instructors. Since the next big overhung terminal cliff is quite far away, we are doing it off the next best thing, this also ensures that only worthy students will finish the course.

Level 1: Flat and stable exit with two AFF instructors.
Level 2: Sidefloater exit with one AFF instructor.
Level 3: Double gainer.

http://vimeo.com/32971347

After successfully completing all 3 levels the student gets his official IWABRTISAJBOPL rating (“idiot with a base rig that is still alive just because of pure luck”). Although the course is very new, the rating is already recognized by other jumpers all over the world.

Thanks to treekicker-Tracey and stressed-Schidi for the fun jumps!

Music: “Dave” by Bodhisattva, available here.

Posted in Videos | 3 Comments

Getting into wingsuit base

After quite a lot of tracking jumps, I started wingsuit base this season. Here a few things I learned:

  • If you find yourself on an exit in a small suit, while every one around you has a X-Bird or a V4, you’re maybe just jumping with people that have big suits, or … you’re on the wrong exit.
  • Swearing in two different languages besides your first language will not make linetwists go away, but is fun to watch on video.
  • Landing in cow poo is yet another thing that is funnier on video than actually doing so.
  • Lowpulls are way scarier than in a tracksuit.

http://vimeo.com/32675646

Seriously, if you are planning to get into this, be aware that you will have one or the other mishap like landing in trees, linetwists, etc., also, you will not always be able to fly out and pull over the big landing areas, so a wingsuit is not a remedy for bad accuracy skills.
And try to not get into that performance-race-against-yourself, it will either get you hurt or depressed, some french guy had to remind me this summer that “this is about having fön”.

One more thing, this is a small part of my 2011 video with all the fön and stupid things I’ve done this year, drop me a mail or comment and I’ll send you the link and password.

Posted in Safety | 6 Comments

Slowmo fun

slowmoVideo video is the thing!

http://vimeo.com/32255151

Playing around with an open source project named slowmoVideo, the initial footage is taken from Gopro’s in setting 4 (1280×960 39fps). There is also a flow-editor included that can help removing artefacts from the video, but i didn’t bother for that clip. So this is a free and really good alternative to the rather expensive Twixtor plugin (350$-700$ depending on platorm and version).
The downside is that you need a Linux box with a Nvidia graphics card to work with it (Mac and Win ports are under development), and you should know how to compile something yourself on it. I also would recommend a fast CPU since render times are quit long.

If a walkthrough on how to setup and use this whole thing is wanted, just let me know.

Posted in Videos | Leave a comment

Pilot chute pull forces

The question “Does a static line jump put more or less stress on your canopy (bridle attachment point) than a free fall jump” has been floating around on the forums for years, and from time to time another experiment (like dragging PC’s behind cars), or mathematical model (that is far from whats going on in reality) pops up and someone thinks he has an answer, although most are flawed in some way.

So here we go again, this time its my turn to give another answer to this issue! My test setup is simple, and enables direct comparison of the static line and pilot chute pull forces the bridle attachment point. (You can find all information and data in this PDF.)

Here’s the conclusion:

On static line jumps done with a loop of standard 80lbs break cord the forces applied to the bridle attachment point are bigger than on any type of free fall jump.

Byproduct of the tests I did with the setup: (all values above should be understood as
approximations)

  • Slider down, PC size appropriate for delay, ~35 kg of pull force on bridle and attachment point are unlikely to be exceeded, although on long delays with an over sized PC this can happen.
  • Slider up, PC size appropriate for delay, ~35 kg of pull force on bridle and attachment point are exceeded (jump with a small wingsuit).
  • Never exceeded ~75 kg of pull force on bridle and attachment point. Slider up & down, terminal with wingsuit, tracksuit, slick.

And here is how i did it, I present the poor-mans-bridle-pull-force-measuring-device.

Since I only want to know if it’s more or less than on a static line jump, this is perfectly good! Maybe it creeps a few people out seeing something like this dangling on the attachment point, but it’s all in the name of science. I did around 60 jumps with this setup, slider up, slider down, tracking, wingsuiting, slick, etc.

You can find all details on what i did and data I collected in this PDF.

Comments and mails are welcome, I would like to hear what people think about this.

wtb

Posted in Uncategorized | Leave a comment

expired yoghurt teaser

Autumn is on it’s way, so I’m starting to put the footage of this year together to a small video, should be finished within a few rainy weekends, so here’s a short teaser.

http://vimeo.com/29873221

Some well known objects, lots of not so well known ones, high stuff,  low stuff, mediocre wingsuit flying, badly performed aerials and lots of fuckups. I will not upload the full version due to some sensitive objects on there, so whoever wants a copy just drop me a mail.

Thanks to nuspliga choa fair trade clothing.

Posted in Videos | Leave a comment

Update on Strike ‘n’ Go

Update to this post.

I got the PC that was used for this jump, I double checked it and it looks fine. Its a 42″ ZP, vented with a piece of PVC pipe as handle. Every panel stretching evenly with the opposite one, and there is no damage on the PC. I’m planning on doing a few jumps with it and having someone video the openings to see if this problem is persistent with this PC.

But theres another thing that was pointed out by another jumper seeing the video, it’s the PC hesitation that occured on that jump. The PC stays in a streamer shape without inflating for half a second. (counted 14 frames with 30fps on the video, click on the picture for a big version)

Right when the PC fully inflates it starts carving, so maybe its one or (most likely) a few of the things below:

  • Getting some impulse from spilling air when it finally pops open.
  • Maybe it wasn’t attached to the bridle perfectly centered.
  • The PC itself tends to carving for some reason that i couldn’t see when checking it. (as said I will do a few jumps with it)
Posted in Safety | Leave a comment

Center cell stripping

http://www.vimeo.com/29396829

The center cell is stripped out of the packjob so fast that it is pulling lines from the tailpocket, leading to a linedump and a very hard opening.
Pilotchute was a 36″ AV ZP,  which I would say is a reasonable choice for a tracking jump, opening  at approximately  2500m ASL with a 280 sqft canopy. It was a pretty fast track, indirect control was in place (rubber band around the fold two times).

I don’t really have anything wiseass to say to this issue, I jumped few seconds before with the exact same setup… Thanks to the jumper for letting me use his footage.

Maybe just the obvious, a too big PC for the delay can lead to all kinds of problems, out of stage deployments, center cell stripping, hard openings, damaged equipment, and other fun stuff.

Posted in Safety | 1 Comment

Strike ‘n’ Go

Similar to a touch ‘n’ go but a lot harder and against a vertical wall…

http://vimeo.com/29058707

The jumper walked away from this strike with a bruised knee and a broken GoPro mainly because he :

  • had good kneepads,
  • had a helmet,
  • was fast on toggles,
  • was lucky!

He hit the cliff only once, stalling and turning the canopy on toggles. The kneepads (freeride knee-shinguard combination from Fox) for sure saved his knee, the helmet had no scratch but the GoPro attached to it got beaten up.

The packjob already turned nearly 180° before it reached linestrech. Because of this I’m pretty sure that body position was not an issue, winds were 0, packjob was nice. Watching the video over and over again, it seems like the PC is circling and is turning the canopy around on its way out. The pilotchute was properly attached to the bridle, but maybe it is spilling air on one side for some reason. I will update this as soon as I get my hands on it to check.
Or this is just another case of sometimes-the-shit-just-hits-the-fan thing that can happen when you throw a lot of fabric and a lot of lines into moving air…

On a closer look on the opening I would say that the brake setting could be set a bit deeper, so besides the obvious (like doing offheading drills, wearing good shoes, wearing a helmet)…

  • Check out a proper deep brake setting for your setup, the factory ones are most likely ok on modern base canopies, but maybe not perfect for your wingloading. If you’re jumping stuff like this, 0.2 seconds more time to turn could make the difference.
  • Wear body armor! It can save your ass! (… or knee, or whatever part of your body it covers …)

Canopy is a Troll DW MDV 245, PC is a 42″ZP AV from Morpheus, and a Gargoyle container. Surprisingly the canopy was not damaged at all.

Comments are welcome.
Thanks to the jumper and the cameraman for the footage.

Posted in Safety | Tagged | 6 Comments

Offheading fun

http://vimeo.com/28703835

  • Bring a set of spare clothes when jumping over water. (even if theres just a little of it)
  • Take care when routing your brake lines.
  • When using toggles for heading correction don’t miss them.
  • Choose your exit point careful when jumping over obstacles.
  • Go for toggles if altitude loss during the maneuver is an issue.
  • Don’t stall out your canopy unless it is really necessary.
  • Think about what offheading procedure fits your object the best before you jump it. (especially for low/sketchy ones)

I intuitively go for risers on major offheadings, except for one occasions that worked very well for me. The downside of the riser turns is that more altitude is eaten up by this maneuver than with a properly performed toggle maneuver, however, risers are easier to grab, when line/riser twists happen risers are the only option anyways.

One thing that keeps bothering me with the toggle turns is the worst case scenario, in which one hits the object despite the evasive maneuver. When a toggle (or both) are lost on impact (eg. dropped, jumper unconscious, arm broken, shoulder dislocated, etc.), the following strikes are going to be way worse than on a canopy that is still in deep brakes.

Posted in Safety, Videos | Tagged | Leave a comment

Using direct control as a tailgate

A simple and effective way to make the direct slider control also work as tailgate for slider up jumps. This isn’t my idea and some of you maybe have seen this before or already use this.

If you don’t use direct control because you think the rubber bands may damage your slider you will not like this method…

1. Do a normal packjob, and seperate left and right line groups, have rubber bands for direct control on both C line attachment points.

2. Put the center D lines between the center C’s.

3. Put the brake lines between the center C’s. Watch out that no other C or D lines are between the center C’s (so only the tailgate lines are there).

4. Put the slider up, take a bit of the slider mesh and put the direct control on. (maybe take the first rubber band only once and the 2nd twice around the mesh, so that if one side is released the other one is too in the same moment)

Voilá, the slider locks the tailgate lines in the middle of the packjob as long as direct control is closed.

The advantages of this method:

  • Its simple.
  • If you are already using direct control, you don’t need to add or change anything on your setup.
  • This should work as effective as a tailgate (since its pretty much the same).
  • No additional hangup risk, actually this is less likely to hang up than a normal direct control. (I never heard of that happen anyways…)
  • Except for a replacement rubber band every now and then you don’t need anything else to do a packjob.

The downside:

  • Your consumption of tailgate rubber bands will increase. (They will break more often than with a normal direct control)
  • The slider mesh will maybe wear out faster, since the tailgate lines are in direct contact with the slider mesh on every opening. I’m not jumping this setup for long enough to give any useful data on this, I can just add that I have used normal direct control for about 250 jumps and my slider is still good. (anyways, making your big-hole-mesh-slider to a bigger-hole-mesh-slider isn’t as bad as they say 😉
  • Not really useful for low slider up jumps where you wouldn’t use direct control in the first place.
  • If you use a deep brake setting so that the brake line attachments are below the C-line attachments this doesn’t work. I found this is works on Trolls with a brake setting already a bit deeper than the factory setting, and should work with factory linesets on Troll DWs, Trangos, and Mojos.

A bit on alternative slider up tailgating mechanisms:

  • Normal tailgate setup and big-hole-mesh-slider is a big no-no.
  • Having masking tape somwehere in my packed rig for a longer period of time would make me worry on the exit, and, although unlikely, can hangup. (this really happened…)
  • Rubberband attached to slider edge to put brake lines into shortens the brake lines a bit, it messes up the way I pack, and I could image this causing tension knots since the lines not touching rubber would be released earlier than the ones that do.
  • Tailgate sewn to slider edge is also more hang up prone than this method.
  • Larksheading a rubberband around tailgate lines and locking it with a piece of slider is a good idea, but will equally wear out your slider and you will loose the rubberband on every jump. Although this would be a good alternative if your brake setting doesn’t allow you to use this method.

Thats my 2 cents on slider up line control methods. Comments are welcome.

One more thing, I always said “just pack nice and you will never have a lineover“, I’m taking this back, sometimes the shit just hits the fan. This was a nice packjob: Lineover clearing itself
So I’m going with this method now.

Posted in Packing, Safety | 1 Comment

Lineover clearing itself

Video of a slider up lineover clearing itself during opening.

http://vimeo.com/28228649

The “snapping” movement of the left side of the opening canopy made me have a closer “frame-by-frame” look at it, and on one frame you can see that the brake line goes over the nose at the 3rd cell from the left.

There packjob was good, the jumper in this video is very experienced and packs in a nice and proper fashion. (I would without any doubt jump a rig packed by him…)

Direct slider control not used, big mesh slider, 265 canopy, 36″ PC, pulled out of a good and fast track. No additional line control mechanism like a slidergate, masking-tape or similar was used.

I would advise anyone to use WLO toggles on slider up jumps, if you don’t already have them, you can get them here: adrenalinbase.com.

Thanks to the jumper for giving me permission to use the video and WBR-Media-Team for shooting it.

Posted in Safety | 2 Comments

Barren E

It was low-stuff-sunday again, so we opened this new cliff. 30min by car, 1 hour hike up, 1 hour hike down from landing after the jump. All this for a 65m wall where Edi tried to scare me by having a 90° off and disappearing from my field of view. So this is not going to be a regular one for me, but it was fun though.

http://vimeo.com/27765729

Posted in Videos | 1 Comment

Watch thy PC handle

After more than 400 jumps I made it to stick my finger into the PVC pipe handle on my pilot chute at pulltime. This is kind of embarassing, since this problem has been known for quit some time.

I’ve seen various work arounds for this. One was by putting a small piece of polystyrene in the pipe for which you don’t need any adhesive if you cut it to the right size. A more common method is putting some tape around the handle.

I’m going with the tape method, I think it adds less weight to the PC’s apex than the polystyrene piece (anyone out there having a accurate scale to confirm this?), and I think the damage that the adhesive can do to the PC is pretty limited.

PVC handle

Posted in Safety | 1 Comment

Case of LS

Deliberately taking away safety margin, by doing unsafe and stupid shit of a sketchy object, just because it’s legal and has been jumped thousands of times before , and for that matter is considered as safe. This is the Lauterbrunnen-syndrome

I’ve seen Jumpers doing high nose slick (or even naked) just for the fun/footage although they have a tracksuit or wingsuit, doing aerials off high ultimate, and so on.

When you think about it, it’s a bit like cutting holes in you wingsuit to get closer to stuff instead of diving. Putting yourself in a situation where you have to perform 100%, on an object that can be normally done with 80%.

And since I don’t like people that think that their ass don’t stink, here’s another video of me doing something stupid that I actually shouldn’t, also off a tall and legal object. I hope you enjoy it. (Always remember, with the wide angle everything looks further away than it actually is.)

http://vimeo.com/27455078

I thought it’s a good idea to do a gainer of the waterfall and it would give an awesome video. Well, the video is kind of nice, but not in the way I intended it to.

Lessons learned:

  • Use thy brain!
  • Even on a tall and legal object that is jumped on a regular basis you don’t get away with murder.
  • Tucking in your legs because you are scared of hitting the object isn’t really helping when it comes to stopping the rotation and starting to track.

I don’t have a remedy for LS, best advice I got was “Don’t stay too long at the same object”.

wtb

Posted in Safety | Leave a comment

The Mindfeck

http://vimeo.com/27289271

A small cliff me and Edi opened this summer.

Posted in Videos | Leave a comment

The Death Swing and Thy Bridle

Producing base jumping footage that scares non-jumpers is quite easy, its about the footage that makes all other jumpers cringe… like this one:

http://www.vimeo.com/26788405

I want to add something to this…
What he did with his legs (as he says in the interview), didn’t directly lead to the bridle entanglement. The only reason that happened was that he fuck up his pull timing and pulled when he was on his back.
But why did he do that?
He already swung out of the rope with a bit of a twist, and by opening up his legs unsymetrically, the rotation axis tilted a bit more, -> this means that the aerial is added a bit of a twisting (srewing) rotation. As you can see in the slomo part at the end, right after he threw the pilotchute he was actually lying on his right side. (after fucking up his position further when pulling)
If your aerial is unintentionally moving out of axis a lot (for whatever reason), and you are not prepared for that, it can fuck up your pull timing because everything suddenly feels and looks different.

However, this is just a theory, maybe it wasn’t his day, or 5 jumps was maybe too much for one day, or he just lost body position awareness for some other reason.

As a side note, having some body armor is a good idea, he was just lucky (which is funny because thats his name…), although kneepads would have maybe killed him. But a helmet would not have done any damage.

wtb

Posted in Safety | Leave a comment

Aerials in Base by Dwain Weston

Since its not possible to locate the document using google anymore, and all links on blinc and bj.com are broken. I’m hosting the file to get it back on google.

This document contains a lot of interesting and important stuff about aerials in base and is a must read if you’re thinking about getting into aerials.

Download here: Aerials in BASE (this site) or from mirror on australianbaseassociation.com.

Thanks to the Australian Base Association.

wtb

Posted in Aerials, Documents, Safety | 1 Comment

Overrotating frontflips

Overrotating aerials is always a bad idea. Doing so on a slider down frontflip is not just like a “normal” head-low deployment, since you still have some rotation momentum that works against the direction the canopy pulls you. So the openings feel harder and offheadings, linetwists, and other fun stuff is more likely to happen.

http://vimeo.com/27054481

If you overrotate too far you can end up with a bridle/leg entanglement, or get your feet into the lines of the deploying canopy. So don’t wear shoes with hooks when doing stuff like this. Even if you already know what you are doing and you got your pull timing dialed in, a PC hesitation can put you in a really bad situation. But thats going to be a different post.

wtb


Posted in Aerials, Safety | Leave a comment

Last year

Some fun stuff i put together 2010, and since I’m moving my videos from youtube over to vimeo I thought I might as well post them here too.

The Infamous PCA Back Flip Wrong Way With Water Landing. I thought about doing it naked but the water was quit cold and I’m a wuss.

http://www.vimeo.com/27053173

And a small part of the video i put together in 2010.

http://www.vimeo.com/27053094

wtb

Posted in Videos | Leave a comment

Frontflips and Thy Bridle

This is about slider down frontflips, me being a lucky bastard, and pull timing aswell as pull technique.

http://www.vimeo.com/26883023

When doing frontflips one should pull when in sit/stand up position, otherwise one will overrotate. BUT when doing a normal pull, = just throwing the PC to the side, you will have a 50/50 chance of where your bridle will be,

  • behind of your arm (good)
  • in front of your arm (not so good)

So i found out how much pull force my 42″ actually has.

Afterwards I got advise from a very experienced jumper to throw the PC not to the side, but away from you in the opposite direction of where you are looking (towards the object). This feels quit awkward for the first few practice pulls but after a few hundred its going to be fine…

This is what works best for me – Frontflip checklist:

  • Pull when in sit/stand up.
  • Throw the PC away from you in the opposite direction of where you are looking.
  • Bring pull hand back quick.
  • After pulling make yourself long to slow the rotation.
  • Put your arms straight up. (If you snagged the bridle to make it slip off your arm easier.)
  • Do NEVER EVER wear body armor on your arms, watches, wristbands, or anything that has snag potential.
  • Always watch thy bridle.

Ah, yeah, and don’t overrotate, but i will show that in another post.

Btw, there is an article by Dwain Weston about aerials in base that is pretty good, but I cant find it online anymore. I think i got it on my harddisk somewhere, if I find it I will upload it.

wtb

Posted in Aerials, Safety | Leave a comment

Bridle knot

How to make a knot in your bridle in freefall.

http://vimeo.com/26740577

Thanks to the jumper for letting me use his footage. He recognized the PC hesitation and after landing he found a knot in the bridle just a bit below the PC.

Conclusion is pretty straight forward, weak pulls are bad, having too little pin tension is bad too, beeing lucky is good, and having the camera turned backwards is priceless.

Seriously, this little mishap had the potential to grow to total malfunction if the knot would have been pulled tight over the PC. To avoid somthing like this from happening:

  • Throw the PC, instead of pulling out and just letting go to minimize the chance of the PC getting into the jumpers burble.
  • Do not hold on to the PC after it is pulled out of the BOC, just pull out and throw it in a single motion.
  • Maintain good pin tension.

As a side note, the fact that the pins were popped already by the bridle contributed to the whole knot thing in the first place, (by giving free more slack bridle) but also would have given him at least a chance to get the canopy out if the knot would have closed around the PC.

wtb

Posted in Safety | Leave a comment

Thou Shalt Watch Thy Bridle

The idea for the name of this blog came to me last winter when I started doing slider down front flips (… sigh …), after a few other fun stories involving stupidity and bridles, I knew my mission was to carry a message to the world:

Thou Shalt Watch Thy Bridle!

wtb

Posted in Uncategorized | Leave a comment